Even with regular cleaning and maintenance, your floors can still dull over time. In some cases, they may become scratched or damaged in a way that a quick buffing cannot repair. Completely stripping the floor of its top protective layer gives new opportunity to apply a fresh coat of wax or new floor finish to give your
Step 1
STEP 1
Clear the floor of obstacles and debris
Before starting the floor stripping process you’ll want to make sure the area to be stripped is free of debris or items like furniture. Move any tables, desks or chairs out of the area to be stripped and then dust mop the entire area. This will remove medium to small debris like paper clips or dirt left on the surface of the floor. Inspect the tile after sweep to find any dirt or gunk stuck to the tile. This may need to be removed with a scraper and some elbow grease.

Step 2
STEP 2
Put out wet floor signs and safety signs

Safety is imperative, especially in a job that will significantly increase how slippery a floor is. Before doing anything else ensure the floor that will be stripped is secured with wet floor signs and any other supporting signage. Stripping a floor is best done in off-hours when building traffic is at a minimum.
Step 3
STEP 3
Organize and prep floor stripping materials
Step 4
STEP 4
Apply floor stripping chemical
With your floor cleaned and items prepped you are now ready to start the floor stripping process. Using your floor stripper solution and mop start in a corner and apply the chemical. Work from a corner moving one strip at a time, similar to mowing a lawn, moving backward so you don’t have to walk in the very slippery floor. After methodically moving from left to right with your mop and providing full coverage on the floor let the chemical rest on the floor.

Step 5
STEP 5
Provide proper dwell time after applying floor stripping chemical
Step 6
STEP 6
Utilize a floor machine to scrub off old finish

While the job can be accomplished with a floor scrubber with the squeegee up and vacuum off most floor stripping jobs and done with a rotary floor machine or orbital floor machine. The most common size of floor machine – commonly called a floor buffer – is a 17” or 20” machine. Combined with a black stripping pad most floor finishes can be removed. Some floors can be more stubborn so a heavy-duty black stripping pad or Dominator stripping pad can be used for the most aggressive floor stripping jobs.
Similar to how the stripping chemical was applied start in a corner and move left to right. The floor will be very slippery so always watch your step and use foot coverings so you aren’t bringing stripping chemical to areas unintended.
When using a rotary floor buffer and black pad you may, depending on how much square footage you are working and how thick the floor finish being removed its, need to flip the floor pad over. After one side had been used up simply flip it and use the fresh side. Once the pad is full of finish and no longer seems to effectively bring up finish dispose of it and add a new pad to your floor buffer.
Step 7
STEP 7
Remove the floor finish after applying the floor stripping chemical
Step 8
STEP 8
Neutralize the floor after the floor finish has been vacuumed
It’s important to understand what floor type you are cleaning and the floor manufacturer's recommendation on chemicals. Resilient floors vs. Non-resilient floors may require different chemicals or applications. Resilient floors could be vinyl (VCT), linoleum includes rubber while non-resilient floors include ceramic tile, natural stone and laminate flooring.
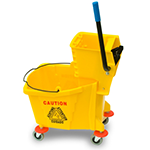
After you understand what type of floor you are stripping be sure to organize your supplies including:
- Mop and Bucket for stripper and another for rinsing
- Shoe Covers
- Floor Machine
- Stripping Pad
- Wet Dry Vacuum
Step 9
STEP 9
Rinse the floor to ensure no floor stripping chemical is left
After the neutralizer has been applied rinse the floor with a clean mop and water. This final step will help ensure all floor stripping chemical and residue is removed from your floor. If it is not, then the new floor finish will have issues adhering to the floor.
Step 10
STEP 10
The final step in floor stripping...
There are a variety of floor stripping pads available depending on how much floor finish has been applied to your floor and generally how aggressive of a stripping job you are performing. While most stripping jobs involve wet stripping there are dry methods available which are primarily driven by the usage of an ECO prep floor pad. Often an orbital floor machine may be used in these instances which will have a much higher RPM than standard rotary floor machines.
Chemical dwell time is a critical step that is often overlooked. For chemicals to penetrate surfaces and do their job they need to sit for a period of time before being wiped or moved. Most chemical manufacturers will have a recommendation on the bottle but a good rule of thumb to use in floor stripping jobs is 10 minutes.
To remove the finish from the floor surface utilize a wet dry vacuum. The most ideal setup is a wet dry vacuum with front-mount squeegee with can be mounted on the front of the vacuum and pushed forward like a lawn mower. Move back and forth until the floor finish and floor stripping chemical has been removed.
Next you’ll need to neutralize the floor which can be accomplished with a floor neutralizer chemical and water. This will be applied with a new mop (NOT the one used in the stripping application). Mix the neutralizer and water based on the chemical label then apply it to the floor in the same fashion as the floor stripper – starting in a back corner then move left to right.
The last step is to simply clean up the equipment and chemicals. Because slip and fall accidents are one of the biggest threats to commercial spaces its imperative the floor and surrounding areas are left dry. Utilize a floor dryer if needed to expedite this process.